The windscreen was installed professionally. I just had to do the electronics and after help from lr4x4 and especially this post this is what I have achieved.
Here is the circuit I have gone for.
I could have used the conventional landrover circuit but I find switching earth very confusing.
Why do you need a timer relay & a high current relay?
- This is because the windscreen takes 30Amps and a timer relay is only designed for about 10Amps and the switch for less than that.
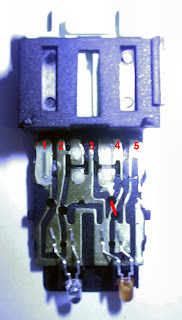
Before the modification the terminals are :
Pin 1 - from Timer Relay
Pin 2 - Live from Dash Illumination
Pin 3 - Not Used (but internally connected to Pin 4)
Pin 4 - To Earth
Pin 5 - Live from output side of Relay (to light the tell-tale LED)
Pin 2 - Live from Dash Illumination
Pin 3 - Not Used (but internally connected to Pin 4)
Pin 4 - To Earth
Pin 5 - Live from output side of Relay (to light the tell-tale LED)
Opening the switch is a little tricky. There are some catches which can be pushed in with a very fine screw driver and the switch pings in half if you push it apart with your thumbs.
After the modification the terminals are:
Pin 1 - Live from fusebox
Pin 2 - Live from Dash Illumination
Pin 3 - To Earth
Pin 4 - Switched Live Pulse to VWP relay
Pin 5 - Live from output side of Relay (to light the tell-tale LED)
To wire up the switch you need a connector plug. These are hard to come by & the only supplier I could find was a ZZPLUG01 from Dingocraft. This needed a small amount of surgery with a stanley knife so perhaps I should have got the ZZPLUG02, but it is in and works.
The connections for the timer relay are:
Terminal 1 - A momentary 12V from
your switch, this starts the timed session
Terminal 2 - Earth
Terminal 3 - Fused 12V supply from battery, this is where your screen gets it power from.
Terminal 4 - Ignition 12V. This is what makes the internals of your timer work
Terminal 5 - Goes to positive terminal of your screen.
Terminal 2 - Earth
Terminal 3 - Fused 12V supply from battery, this is where your screen gets it power from.
Terminal 4 - Ignition 12V. This is what makes the internals of your timer work
Terminal 5 - Goes to positive terminal of your screen.
The correct way to get the power to the switch & timer relay is to use a feed from the oil pressure switch but I have to confess I did not know where that was. The reason for using the oil pressure switch is to stop you using the windscreen without the engine running (to stop you getting a flat battery).
I cheated. The electric windows will only work with the ignition fully on so I took my feed from there, with the addition of a 5Amp fuse between the electric window feed and my circuits. It is obviously possible to turn the ignition to position 3 and not start the vehicle & then turn on the windscreen but who would be so daft.....Only time will tell!
Next up I will be fitting heated mirrors from mudstuff. The circuitry will be identical except that they do not need a feed direct from the battery as they only draw a couple of amps.
Significant Parts list:
dash switch - part number: YUG000460LNF
timer relay - part number: Ref:74350
high current relay: maxi relay Ref: 268763
dash switch connector


After a years use I am so pleased with this. Frosts are not that common but as a general defugger the heater gets used more days than not. Get one. You will not regret it.
ReplyDeleteI find many useful things herewith. It is really amazing for us. Where ever we are, just click on the website and Take advantages regarding regarding Techno British.Your article impressed me very heartily. From a last decade I was searching such type of web site. Thanks for giving me a space in your blog. I refer this to my close friends who are already seeking for the same .thanks again guys…
ReplyDeleteIt has been some time since I visited website with such high quality information about regarding land rover parts Thank you so much for providing such helpful information. This is really informative and I will for sure refer my friends the same. Thanks.
ReplyDeletethis is really informative. I will for sure refer my friends the same. Thanks Hi, I was simply checking out this blog and I really admire the premise of the article this is regarding land rover partsHi, just a moment back I was searching for the information regarding MLM chandigarh Products. and now I am here. So much information, really well executed blog. This is really informative and I will for sure refer my friends the same. Thanks
ReplyDelete