Tuesday, 1 November 2016

Garmin Etrex routes with more than 50 waypoints

I have a Garmin etrex 25 Touch.

Supposedly capable of creating routes with upto 250 waypoints, but boy this has had me beaten for ages.

So like most other people I have ended up following tracks, which are effectively breadcrumb trails. One disadvantage of this is that you get no aid other than looking at the GPS and seeing where you are & where you want to be. I.E. You get no beaps at turn points.

If I create a route with over 50 waypoints & load it on to the Etrex & try & follow it I get an error saying "Only 50 points can be used for follow road navigation".

I have now found a solution/work around that appears to work.

  1. on your etrex click on 'Routing' & set the Activity to 'Prompted'
  2. Create a track (not a route) using your chosen tool. I often use gpsies.com setting the number of points to < 250.
  3. open the track in Garmin's 'Basecamp' software
  4. right click in the track & select 'Create route from track'
  5. you can view the new route & note the number of waypoints is < 250. The activity in my case is set to 'Mountain Biking'. this is fine.
  6. using Basecamp copy the route to the Garmin etrex.
  7. turn on the etrex, & once in the chosen sport, MTB in my case, select 'Routes', then select the chosen new route, select 'Go', then instead of the annoying message, 'Max 50 points...' you get a menu & select 'Direct Routing'.
  8. & off you go

Happy navigating.

Monday, 14 January 2013

defender TD5 starter motor removal

Three times in the last month my defender has failed to start.
Turns out it was the starter motor and a judicious tap with a hammer on the motor would spring it back to life.

Now this is obviously not a permanent fix and sooner or later it would fail permanently.

New starter motors can be £200+ & then there is the garage charges making this a costly failure.
A few google searches and the most likely issue is the solenoid contacts so I purchased a kit from repairkitsuk. I paid the extra and got the kit next day.

The starter motor is a tad awkward to get at to say the least & an assistant will make life a lot easier.

To remove the motor you will need a
  •  13mm socket
  • 15mm socket
  • 3 inch extension
  • universal joint
  • 3 ten inch extenders
  • possibly 13 & 15mm spanners
  • 1/2 inch drive
To open up the solenoid you will need:

  • 12 or 14mm spanner - can't remember
  • 8mm socket

The starter motor is held on with two 13mm bolts & a 15mm nut, The two 13mm nuts are relatively easy to see & get at from underneath. The tricky one is the 15mm nut. This is located on the inside side of the starter at the top & there is not enough room to get a socket & ratchet in from the top.
  1. Disconnect the battery 
  2. First off remove the top engine cover. Not absolutely necessary but it lets a lot more light in
  3. Disconnect the bottom pan & shove to the LHS.
  4. Disconnect the electrical connections
  5.  Loosen the two 13mm nuts - access from underneath.
  6. 15mm nut
    1. attach the 15mm socket, 3 inch extension & universal
    2. get the assistant to attach this to the nut accessing the starter from above & stay there waiting...
    3. Connect the three 10 inch extensions to the drive
    4. NB access is not from fully underneath
    5. Insert the extension set from the front above the floor pan & differential at an angle of about 30 degrees upwards. You might see the assistants fingers.
    6. The assistant can then get the extension to connect in to the universal
    7. Undo the 15 mm nut
  7. Remove the two 13mm nuts
  8. The starter motor is now free to remove.

The instructions provided by repairkitsuk were perfect. We actually only changed the plunger & contacts. Other parts are provided but we decided everything was good.

Assembly is simply the reverse process.

Tuesday, 11 December 2012

android, part 3: Upgrading my Motorola Defy

This is part 3 of three posts:

NB: doing these operations will invalidate your warranty & may brick your phone. I take no responsibility & you proceed at your own risk. Saying that it worked for me so I am alright jack.
  • Part 1 describes how to root your phone
  • Part 2 describes how to back up your data
This third & final part describes how to upgrade your phone. NB: You must have done parts 1 & 2 first.

There are lots of different versions that people have created for you to use to upgrade your phone. After a good ammount of research I went with CynagenMod. However the problem I had was that they had not fully automated the process for the Motorola Defy.

I suspect some of the steps I have done here were not necessary but anyway this is what I did.

First off here are some useful links:
NB: For anything you download it is wize to also check the checksum of the file as well. There are various MD5 check sum tools on the web.

  1. NB: You must have done Part 1 first & I strongly reccomend that you do Part 2 as well.
  2. installed RomManager on to the phone from marketPlace
    1. NB: I think this was one of the unnessary steps for me, as cynagen Mod do not have a fully automated Defy build
  3. Install Bootmenu
    1. To do this you need ADT. This is a tool that gives you command line access to the phone from your PC. The instructions imply you need eclipse (which I already have) however I do not believe you do. 
    2. Just down load this & then navigate to adt-bundle-windows\sdk\platform-tools to find adb.exe
    3. The rooting instructions are here but here they are anyway:
    4. adb shell
      su
      cp -R /sdcard/bootmenu /data/bootmenu
      cd /data/bootmenu
      chmod 755 *
      ./install.sh
      rm -R /data/bootmenu
    5. Bootmenu instructions are here.
  4. Boot the phone in to the bootmenu as described here
    1. for the defy that means:
      1. power off
      2. power on
      3. when the little LED comes on & turns blue press the down volume button.
      4. you should now be in the boot menu
      5. navigation is done by the volume buttons & selection via the power button.
  5. Take a ROM backup from with in the bootmenu of your current android version.
    1. This will take quite a while
    2. Copy it off the phone - you will need to fully boot the phone again to get the back up off
    3. It can be found on the sd card in /clockworkmod/backup
  6. Now for the exciting part. So far everything you have done is safe. This is the big one & there are plenty of warnings along the way.
  7. download your chosen android ROM. Mine was an ICS version - CM9-NIGHTLY-121116-Defy.zip
  8. download GAPPS.
    1. I did install GAPPS as described below however it failed (I know not why). I simply installed all the google apps I wanted by hand & so far to no detrimental effect.
  9. copy both these to the root of your SD card.
  10. Boot back in to the bootmenu
  11. The flashing of the new version of android is described here.
  12. The menu options required for all the below are under the tab [Recovery Mode]
    1. Wipe data/factory reset
    2. Wipe cache partition
    3. choose android zip & install
      1. takes a few minutes
    4. choose gapps & install
      1. again takes a few minutes
      2. I guess I had the wrong version as this said it was done but after reboot I found I had no google apps so I decided just to install them by hand from the play store.
    5. Reboot the phone from the boot menu
  13. The reboot process this first time will take a good few minutes so do NOT PANIC.
  14. After rebooting you are lead through the usual initialisation options and then install the apps you want.
  15. Any apps you have bought & paid for are know by the play store so you will not be charged again.
Good luck 

android, part 2: Backing up your phone

This is part 2 of three posts & describes how to back up your data.
This is an essential part of the process if you wish to upgrade your android version, but equally it can & arguably should be done as a matter of course.

NB: doing these operations will invalidate your warranty & may brick your phone. I take no responsibility & you proceed at your own risk. Saying that it worked for me so I am alright jack.
  • Part 1 describes how to root your phone
  • Part 3 will describe how I upgraded my Motorola Defy from 2.2.2 to 4.0.4
Backing up your phone data can take various forms I did all these descibed here.

  1. I installed 'app dragon'. This simple little app just creates a list of your installed apps & their versions which I then emailed to myself. It is not a back up app as such.
  2. I installed titanium Backup & backed up all the apps. The backup is stoed on the sd drive which I then copied off to another PC.
  3. I performed an APN Backup. This is a backup of all your network settings.
  4. I did a full backup of the sd drive on to a remote PC
Described in Part 3 I also perform a full backup of the currently installed version of android.

The thing I did not do because I assumed it was done as part of the above was backup the bookmarks in my favourite browser Opera. So I lost these in the process of performing the android upgrade.

Friday, 24 August 2012

android, Part 1: Rooting my android phone

In preparation for putting a more upto date version of android on my Motorola Defy I need to 'root' my phone.

This is Part 1 of three posts:

NB: doing these operations will invalidate your warranty & may brick your phone. I take no responsibility & you proceed at your own risk. Saying that it worked for me so I am alright jack.
  • Part 2 describes how to back up your phone
  • Part 3 describes how to upgrade your phones android version

I followed the instructions here.
Please note the following though:

  • Despite the instructions I had to have USB debugging enabled. See here.
  • The process involves several automatic reboots of the phone.
  • The system asks for & appears to need BusyBox installed on your PC.
You can test to see if your phone is rooted using an app called ConnectBot described here.

The first root specific app I have installed is the much praised Titanium Backup. So far just the free version.

Next step will be the big one. Installing a newer version of android.

Wednesday, 30 November 2011

Heated Windscreen for a Landrover Defender

I bought myself a landrover Defender just before last winter & after having to scrape ice off the inside as well as the outside I thought I would invest in a heated windscreen.

The windscreen was installed professionally. I just had to do the electronics and after help from lr4x4 and especially this post this is what I have achieved.

Here is the circuit I have gone for.


I could have used the conventional landrover circuit but I find switching earth very confusing.

Why do you need a timer relay & a high current relay?
  •  This is because the windscreen takes 30Amps and a timer relay is only designed for about 10Amps and the switch for less than that.
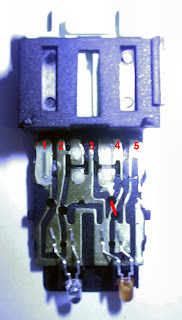
A simple switch from maplin would suffice but I fancied a proper landrover switch. The slight issue here is that the switch is designed to switch earth. Thankfully a clever gent from lr4x4 has suggested this mod and I can vouch that it works. You need to open up the switch carefully and cut one of the tracks.

Before the modification the terminals are :

     Pin 1 - from Timer Relay
     Pin 2 - Live from Dash Illumination
     Pin 3 - Not Used (but internally connected to Pin 4)
     Pin 4 - To Earth
    Pin 5 - Live from output side of Relay (to light the tell-tale LED)


Opening the switch is a little tricky. There are some catches which can be pushed in with a very fine screw driver and the switch pings in half if you push it apart with your thumbs.

After the modification the terminals are:

     Pin 1 - Live from fusebox
     Pin 2 - Live from Dash Illumination
    Pin 3 - To Earth
    Pin 4 - Switched Live Pulse to VWP relay
    Pin 5 - Live from output side of Relay (to light the tell-tale LED)


To wire up the switch you need a connector plug. These are hard to come by & the only supplier I could find was a ZZPLUG01 from Dingocraft. This needed a small amount of surgery with a stanley knife so perhaps I should have got the ZZPLUG02, but it is in and works.

The connections for the timer relay are:
     Terminal 1 - A momentary 12V from your switch, this starts the timed session
     Terminal 2 - Earth
     Terminal 3 - Fused 12V supply from battery, this is where your screen gets it power from.
     Terminal 4 - Ignition 12V. This is what makes the internals of your timer work
     Terminal 5 - Goes to positive terminal of your screen. 


The correct way to get the power to the switch & timer relay is to use a feed from the oil pressure switch but I have to confess I did not know where that was. The reason for using the oil pressure switch is to stop you using the windscreen without the engine running (to stop you getting a flat battery).

I cheated. The electric windows will only work with the ignition fully on so I took my feed from there, with the addition of a 5Amp fuse between the electric window feed and my circuits. It is obviously possible to turn the ignition to position 3 and not start the vehicle & then turn on the windscreen but who would be so daft.....Only time will tell!

Next up I will be fitting heated mirrors from mudstuff. The circuitry will be identical except that they do not need a feed direct from the battery as they only draw a couple of amps.

Significant Parts list:
    dash switch - part number: YUG000460LNF
    timer relay - part number: Ref:74350
    high current relay: maxi relay Ref: 268763
    dash switch connector


Friday, 15 July 2011

Creating & storing maps on your phone

I have an android phone & I have tried various mapping software applications.
My current favourite is Maverick. This is a great free mapping app with access to all sorts of mapping formats even 1:25,000 Ordnance survey maps for the UK.

The trouble most of these solutions is that the maps are requested on demand, so when you are up in the hills you can not get at the data and when you are abroad it will cost you a fortune.

The solution is to get the data before you need it. Most mapping apps store the requested maps as you view them so you can pan around while on wi-fi for the area you are interested in to view when you are up in the hills.

But what if you want maps for a large area. I am off to Spain soon and found it was taking an age to get the maps I wanted so I looked for an alternative solution.

I chose Mobac. This runs on your PC, downloading the maps and converting them to the mapping software of your choice. You select an area, the style of map and the map client software and away you go.

Things to look out for:
  1. The more detailed (zoomed in) maps you choose the larger the data. Its pretty well exponential. Avoiding level 16 will save you loads of time & data.
  2. Getting the data on to the phone is also a pain. Transferring 1000s of individual files takes an age. I tried the likes of FastCopy but they corrupted the URL of the USB mounted directory of the phone. I ended up zipping up folders of files, copying these to the phone and unzipping.
  3. Connecting wifi'ly has made all the difference to data transfer. Much much faster than USB.


The mapping format I have chosen are the excellent OSM cycle map.
Combing maverick with the excellent Gpsies.com is proving excellent.